
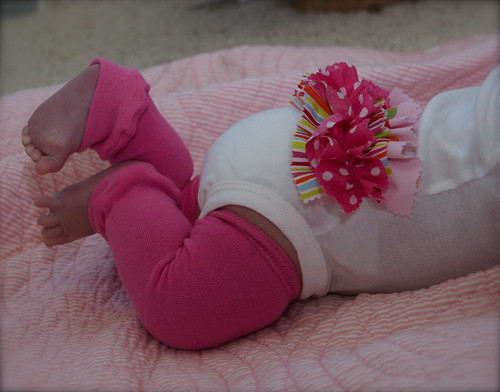
How stinkin' cute are those chunky little legs and the ruffles on that bottom? I've been wanting join the ruffle craze and make something I saw on this blog a while back. Love her, by the way. Ashley Ann's blog is one of my favorites to look at. Check her out if you want to learn great photography tips and fun & creative DIY projects.
Sadly, I do not have access to a serger, so I tried it using pinking shears instead. What are pinking shears you ask?
These are pinking shears. They are supposed to help prevent fabric from fraying and I borrowed them from my mother. If you do not have a mother with pinking shears, I'm sure you can find them at any fabric or craft store. Thanks mom!

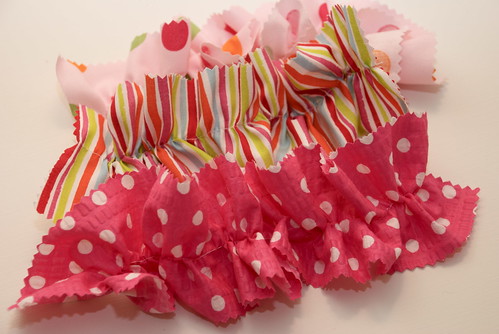
Step 1: Cut three strips of fabric 3" x 15"
(I'm guesstimating here. Didn't measure when I was sewing, but I basically made the strips 2.5 times longer than the width of the bottom of the onesie.)

Step 2: Using the largest stitch on your machine, sew down the middle of each strip of fabric. Then gather each strip until it is the exact length from one side of the onesie to the other. Tie off the ends of thread so the ruffle doesn't come out.
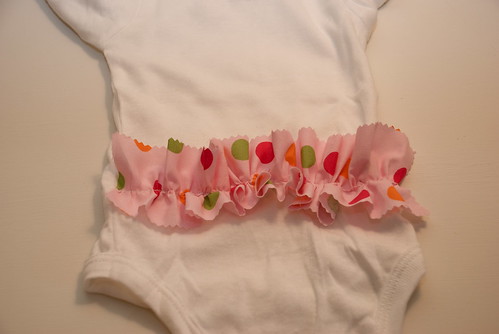
Step 3: Sew the first ruffle onto the back of the onesie and remember to change your stitch length back to normal!
Step 4: Sew the other two ruffles on, each one a little lower than the first.
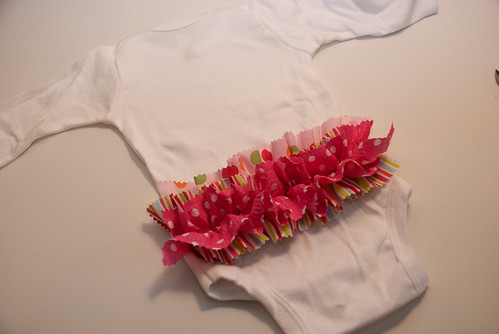
You are done!
These would make such fun baby shower gifts. I have no idea how the ruffles will hold up in the wash, but I'll be sure to let you know. And I just couldn't resist trying out this tutorial for some baby leg warmers. I think this was the simplest thing I've ever sewn. It took about 2 1/2 minutes to make a set. All I had were these hot pink socks, but now that I know how easy they are to make, I'm on the hunt for some cuter designs!! These will be great to cover those chunky legs this winter. ;)
On another crafty note, I regret to inform you that I'm no longer taking orders for dolls for Christmas. This really saddens me because I can't stand to tell someone "no" when they inform me of how much their daughter/niece/girlfriend/etc. loves their doll and want to purchase another one for a gift.
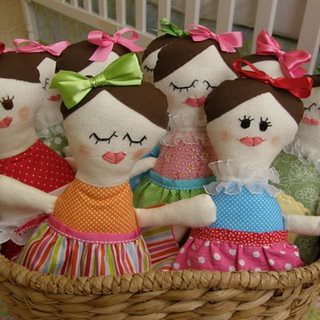
It brings me joy to hear how much these little girlies are loved because I think about the person I'm making them for when I'm stitching them together. However, I just dropped off the last order at the post office this morning and realized I'm nuts to try to continue making them right now while trying to prepare for our holiday festivities and accomplish all of the gifts I need to make on my Christmas list and stay a sane, fun, and happy wife & mama. However, I have re-stocked the shop with patterns and dolls kits for those who are interested in making their own for the holidays. You can e-mail me or click on the shop link I've put on on the side bar of the blog to purchase one.
I've got a busy day planned of getting ready for what I hope will be a super fun party on Thursday morning. Hopefully I will have some pictures to share!
I love this Mary Catherine! You're making me "wish" I'm having a girl. Guess we'll find out Monday :o)
ReplyDeleteI could just pinch those thighs! Love it! :)
ReplyDeletemaybe one day i'll have a girl...
ReplyDeleteI'll definitely use this tutorial in a couple of months! Right now I'm up to my eye balls in baby clothes! I hope she'll be able to wear all of them! After about 3 months though we'll start needing some things! :)
ReplyDeleteLOVE the new post and the ruffles... so wish I lived in Columbia and could have come to your "party"!! the girls are absolutely BEAUTIFUL- I love the new pictures!
ReplyDeleteThanks for the tutorial ! I'm going to attempt to get started this morning on this project :)
ReplyDeleteI have been looking for something to make for my friends baby girl. I am thinking this is it:)
ReplyDelete